How to: Windows 10 migration – migrate applications, profiles, settings and files
In this article, we’ll learn how perform enterprise-wide migration to Windows 10, and keep it as automated as possible. The focus of this how-to is to migrate user profiles and applications to Windows 10 automatically, preserving user personalization, custom applications, profile settings and, of course, files.
This can be achieved for migration from one computer to another with Windows 10, for in-place upgrade to Windows 10, cross-domain migration and other scenarios. Of course, migration from Windows 7, 8 or 10 to new Windows 10 systems is fully supported, as well as 32bit to 64bit migration.
Just want to find out how to automate the migration, and don’t need a general tutorial? Click here to skip to the part with the actual migration process.
Or, if you need to migrate servers, click here for server migration.
After choosing your desired Windows 10 branch and edition, and picking your OS deployment strategy, the next task to tackle is the actual process of migrating your users from their existing systems – to Windows 10.
A major part of that is developing a process to migrate the contents of the user’s system to the new OS. At a bare minimum, this includes the user’s profile, settings, accounts, passwords, PSTs, personalization. In environments that allow them, users would also need their personal data and custom applications.
Of course, if the users do not have too much personalization and do not use custom application, the migration becomes an easy task, and can be implemented by simple approaches such as roaming profiles.
This tutorial focuses on migrating personalized users profiles, and even custom applications, to new Windows 10 systems.
Before you begin: Take inventory and plan your migration
The first step in a migration is to take inventory of what you have: hardware, OS versions, standard applications, custom applications, user personalization. Typical concerns at this stage are:
Is the hardware good enough to run Windows 10?
(This is only relevant when doing an in-place upgrade to Windows 10 of course)If some of the machines involved in the upgrade are too old and cannot properly run Windows 10 (i.e. 2GB or less of RAM, older CPUs), you need to consider replacing them with newer hardware.
Are all applications compatible with Windows 10? 32bit to 64bit?
Assuming your existing machines are not running Windows 10 already, you need to check that the applications you are using are compatible with Windows 10. Apps that run on Windows 7 or higher will typically run on Windows 10 as well, but not always (especially custom-developed software). Same for going from 32bit to 64bit.
Do users have (and need) personal applications? Or can you get away with a golden image?
What about user personalization and personal files?
What do you want to transfer?
Once you’ve mapped out the existing environment and potential challenges, the next step is to decide what you want to migrate – and what will be standardized. Typical approaches are:
Total migration:
In this approach, every user’s entire environment gets migrated as-is, including applications, settings, profile and data. This maximizes the user’s feel-at-home experience on the new machine, and reduces the effort required from the IT team in preparing the new workstations, since only a standard Windows install is needed and the rest is taken care of by the migration. The downside is potentially missing an opportunity to upgrade some of the applications as part of the migration.
Minimal standard set of applications + migration of custom applications, settings and data:
This approach is similar to total migration, however the standard image includes new standard versions of common applications, such as Office, accounting, ERP and other company-wide software (or several images, one for each user type / department). Using the migration process below, it is possible to migrate the rest of the user’s applications and settings, and combine that with the standard base image. This tends to be the preferred approach in personalization-rich environments, combining relatively low IT effort with full personalization.
Golden image + migration of profile and data only:
This approach eliminates custom user applications in favor of a standard image. On top of that image, the user’s personalized profile and data is migrated and integrated with the standard applications.
No migration at all:
Finally, migration may be skipped entirely, and everybody gets the same workstation. This is typical in task-oriented environments, such as call centers or kiosk-based workstations, where the machines are not personalized or used by many different users, and no real migration is required.
How to migrate to Windows 10
There are two primary ways you can perform the migration: either directly from one computer to another (over the network), or indirectly, using shared network storage, NAS or even a USB drive. Below is the process description for each option.
Before you start the transfer
Assuming the machines are in a domain, make sure to add the target to the domain first. Then, login as same domain user on both computers. It doesn’t matter which user (all other profiles are transferred as well), just that it is the same on both. For example, you can login as the actual end user, or just as your administrator user.
If you are transferring over the network, consider disabling the firewall on the old machine, or at least adding Zinstall to its whitelist.
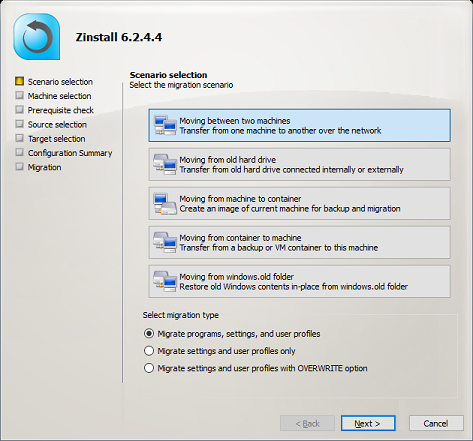
Option 1: Direct migration to Windows 10 over the network
Select the first option, “Moving between two machines”, on both computers.
If you do NOT want to transfer programs, and are only interested in a profile transfer, switch the radio button on the main screen to “profile and settings only” mode.
On the old computer, choose the “Source computer” option, and leave it running. It will be waiting for connection from the new one.
On the new Windows 10 computer, choose the “Target computer” option.
Migration Kit Pro will automatically detect the source computer.
If you’d like to select exactly what you want to transfer, press the Advanced menu. If you just want to transfer everything, you don’t need to go to the Advanced menu.
Click Next and then Go to start the migration.
The transfer will take a while (depending on how much data you have to transfer), and report to you when done.
That’s it!
Option 2: Indirect migration, via intermediate storage
On the old computer, select the 3rd option, “Moving from Machine to Container”
Choose the container location (such as a network share, a NAS, a USB hard drive – any type of storage), and press Go to perform a full capture of the source machine to that location.
On the new computer, select the 4th option, “Moving from Container to Machine”
If you do NOT want to transfer programs, and are only interested in a profile transfer, switch the radio button on the main screen to “profile and settings only” mode.
Specify the location of the container created in step 3.
If you’d like to select exactly what you want to transfer, click the Advanced button. If you just want to transfer everything, you don’t need to go to the Advanced menu.
Click Next and then Go to start the migration.
The transfer will take a while (depending on how much data you have to transfer), and report to you when done.
That’s it!
After the migration
Once the migration is complete, do a quick verification of user’s most common applications and files. You don’t have to verify the actual files (Zinstall migration is complete), however you may sometimes need to make small adjustments in client application configs – for example, if something has the old computer’s name hardcoded, or if you’ve moved your user into a new domain site.
Keeping end-users satisfied
Transition to a new OS may require some adjustment from the users. They will be facing a new interface, different ways to get things done, different placements of system menus and their icons.
With that, assuming you have their profiles properly migrated, retaining the familiar wallpaper, icons on the desktop, personalization will greatly help the user “feel at home” and reduce support calls and general dissatisfaction.
In businesses where personal data and applications are commonplace, migrating those will also be a significant boost in user acceptance.
Migration Automation
The migration process described above can be automated by running Zinstall Migration Kit Pro from command line, logon script or management frameworks such as SCCM.
For example, you can script a department-wide creation of containers, saving them to network storage, and then deployment of those containers onto new Windows 10 machines.
This can be scheduled for off hours, night, weekends etc. to reduce impact on users (although the user can work on the machine while the migration is in progress).
See “Command line execution” in the user guide for more information.
Summary
Windows 10 migration may look like a daunting task, but it seems to be an easier challenge than migrating from XP to Windows 7. With proper planning and right tools for the job, even a large-scale migration can be done on time, on budget and with satisfied end users.
We hope that this tutorial have helped you along that path!
Ready to migrate to Windows 10?
Contact us for assistance, volume licensing, and help in setting up a POC.